Drawing a Still Life
with Barbara Silbert
1. SET UP
Set up your objects on a tablecloth, and find another cloth to prop up behind it & tape to a wall or a large board.
2. SHADING
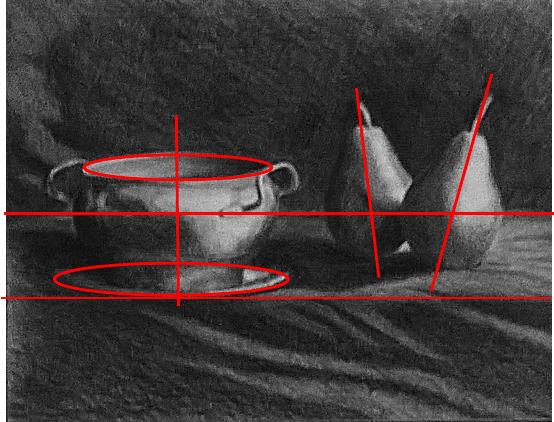
Find the tallest item first and mark the top and bottom of it, then the others.
Draw a line down the middle of each item, noting if they have an angle or are straight. (see which red lines are straight and which are angled)
Then draw the curves on each side of the red line, making sure the curves on the bowl are equidistant from the center red line; the curves of the pears may be a bit different, or non-symmetrical and one side may be fatter than the other.
Look at the flattish ovals that form the top, bottom, and plate of the bowl. The oval of the plate drops behind the bowl & you just see the front of the plate. There’s a smaller oval at the very bottom of bowl.
3. SHADING
Using a 6B sharpened pencil, hold it on the flat side and shade the darkest part of the bowl & pears, using more pressure to get it darker. Then do the same with the mid-tones, and leave the paper white for the lightest tones, or highlights.
4. TABLECLOTH
Draw fold lines on the angles you see, then shade between them.
Next week we will use colored pencils to work on the same still life.
Happy Drawing, Barbara
_______________________
About Barbara Silbert:
 Barbara Silbert’s work has been acknowledged with more than 50 awards in various venues. She has taught Pastel Portraiture at the Nassau County Museum of Art and is presently teaching at The Art Guild and Great Neck’s school of Community Education at Cumberland. Silbert has taught adults, children, teens and seniors locally for the past 15 years.
“Passing along what I have learned gives me the greatest pleasure of all.”

